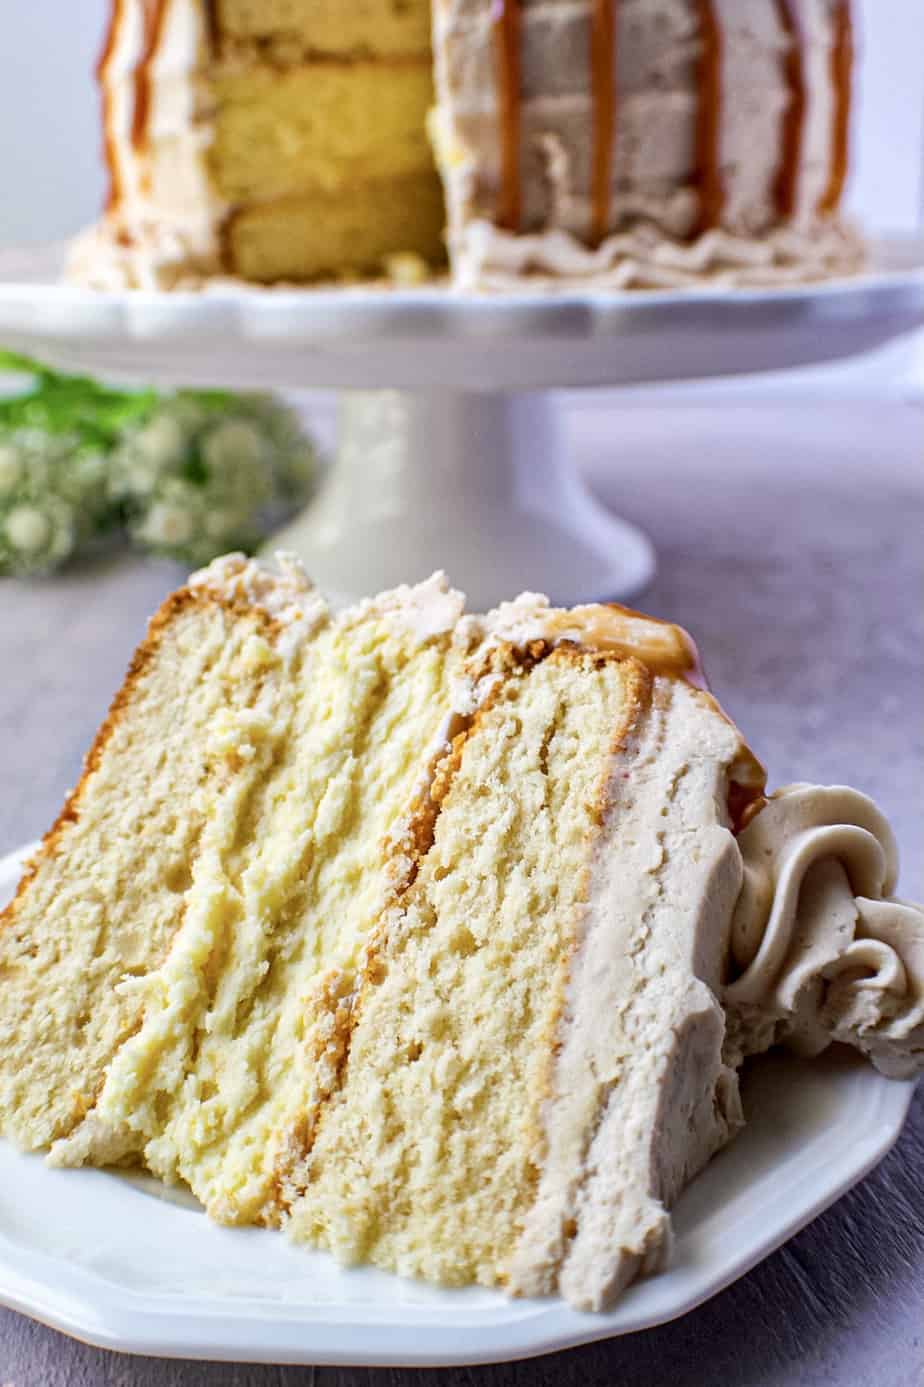
This fluffy caramel cake has a silky smooth cheesecake layer in the middle and features a delectable salted caramel in the cake and frosting. It is then finished off with a caramel drip. You will be in love!

Table of Contents
About this Caramel Cheesecake Layer Cake
I wouldn’t say this cake is hard to make, but it does take some time because of the two different cake elements. I made my cheesecake layer first and let it set overnight. Then the next day I bake the cakes and put everything together. You could do it all in one day but I recommend baking the cheesecake first thing in the morning, so it has time to chill.
This recipe does feature a delicious salted caramel sauce in both the cake batter and frosting. You will have to make your caramel sauce well in advance and allow to cool to room temperature before incorporating into your cake and frosting.
One thing you want to be sure of when making the three layers is that they are all the same size. I used 9-inch cake pans for the cheesecake and cake layers and it made things so easy. To prepare the pan for the cheesecake, I just pressed nonstick aluminum foil into the bottom of the cake pan and had it sticking up over the sides of the pan. I used the foil to lift the cheesecake out of the pan once it was cool and firm. I ended up with the perfect cheesecake size to match my cake layers.
To frost the cake, I used a salted caramel buttercream. Either make your buttercream fresh when ready to frost or give a mix in the stand mixer before frosting to make sure it is the right consistency for frosting.
This cake was BOMB y'all! Everyone was surprised by the little bits of saltiness that came through from the caramel. The creamy vanilla cheesecake coupled with the rich, sweet caramel cake was pure heaven. The whole family approved!

How To Make the Homemade Caramel Sauce
There are lots of different ways to make caramel and I am going to tell my absolute favorite way. It's surprisingly easy and yields the best deep caramel flavor!
You will need:
- large pot
- whisk
- granulated sugar
- water
- heavy cream (room temperature)
- butter (room temperature)
- salt (if making salted caramel)
Once you have everything ready to go, place the sugar and water into a pot and stir to combine. Do not stir anymore after this! Stirring will cause the sugar to crystallize, and we don’t want that! Place the pot over med-high heat and bring the mixture to a boil.
Continue cooking the sugar until it starts to change color. This can take anywhere from 5-10 minutes. I recommend watching the sugar the entire time, as once it starts to color it can burn VERY quickly. I do not take my eyes off of the pot after the first couple of minutes of cooking.
Continue cooking until the sugar is a nice amber color. The smell will be heavenly!
Immediately remove the pot from the heat and slowly pour in the heavy cream while quickly whisking. It will bubble up A LOT, so be prepared. Once all the cream is whisked in, add the butter and whisk until incorporated. Return to heat and simmer for about another 2 minutes.
I transfer the caramel transfer the caramel to a heatproof container and let it cool. You can also just leave it in the pot to cool. Be careful when handling the caramel at this point as it is very hot. The caramel will thicken as it cools.
You can leave it at room temperature overnight or place it in the fridge if storing for longer. If you store it in the fridge, you will need to warm it up just a bit in the microwave to room temperature before using.
Important Tips for Making the Caramel Cake
Prep your pans. Make sure to grease your pans and add a circle of parchment paper in the bottom of each pan. This will guarantee the cakes come out in one piece.
Cream the butter and sugar long enough. This is a step that is often overlooked. . When you beat softened butter and sugar together on high speed, it fluffs the butter for a light airy cake texture. To do this properly, it usually takes a full 3-5 minutes. If you skip this step, your cake will come out dense, instead of fluffy.
Measure properly. I like to think of cooking as art, and baking as science. If you are heavy-handed when measuring, or don’t add enough of an ingredient, you will not get the consistency you desire. Be exact. And don’t forget to sift your flour before measuring.
Scrape the bowl. Use a rubber spatula to scrape the mixing bowl in between steps, so all the ingredients are incorporated evenly.
Do not open the oven while the cake is baking. Leave it alone y’all! Don’t open the oven door seventeen times while it’s baking. It needs that consistent heat, and no movement to rise properly. Just be patient and you will be elated with the results.
Cool cake completely. Don’t rush to frost the cake. Make sure to give your cake plenty of time to cool. Even a little warmth will make the frosting melt down the sides as you try to smooth it.
Important Tips for Making the Vanilla Cheesecake
Use the same pan that you use for the lemon cake. This ensures that your cheesecake layer is the same size as your cake layers.
Don’t over beat your cheesecake before baking it. Please don’t. You want a CREAMY texture, not FLUFFY. Be sure your cream cheese is room temperature before starting.
Don’t skip the water bath. It does not always prevent cracking but does ensure your cheesecake has the perfect melt in your mouth texture. And your cheesecake pan does not have to sit in the water bath. You can also place a large pan of water on a rack just below the cheesecake in the oven. It adds the perfect amount of moisture to the oven while cooking.
Be sure and cool in oven before removing. Do not skip the 30 minutes of cooling in the oven with the door closed or the 30 minutes with the door cracked. This helps prevent your cheesecake from cracking.
Important Tips for the Caramel Drip
It’s important that the cake is chilled. A good hour in the fridge should do. Be sure your caramel is a good consistency for dripping. It need s to be a tad bit thick so that it stops before reaching the bottom. Whatever you do, do not use warm caramel to drip! This will melt the buttercream.
I recommend doing a test drip on the back of the cake first. Really, it just takes some practice to know what the right consistency is. Always use a chilled cake though, and make sure your caramel is not warm.
I use a teaspoon to do my drip cakes, but you could use a squeeze bottle or plastic bag if you prefer. I prefer the control you have with the spoon.

You Will Also Love This Lemon Cheesecake Layer Cake!
📖 Recipe
Caramel Cheesecake Layer Cake
Ingredients
Caramel (make in advance)
- 1 ½ cups granulated sugar
- ⅓ cup water
- 225 mL heavy cream room temperature, use measuring cup to measure out correct amount
- ¾ cup unsalted butter room temperature
- ½ teaspoon sea salt optional to taste, for salted caramel
Cheesecake Layer
- 24 oz (3 blocks) cream cheese room temperature
- 1 cup sugar
- 3 tablespoon all-purpose flour
- 1 cup sour cream
- 1 tablespoon vanilla extract
- 4 large eggs room temperature
Caramel Cake Layers
- 2 ¼ cups all-purpose flour
- 2 ¼ teaspoon baking powder
- ¾ teaspoon salt
- ¾ cup unsalted butter room temperature
- 1 cup granulated sugar
- 3 large eggs room temperature
- 1 ½ teaspoon vanilla
- ½ cup prepared homemade caramel
- 1 cup buttermilk room temperature
Frosting (will need TWO batches)
- 1 cup unsalted butter room temperature
- 4 cups powdered sugar
- 2 teaspoon vanilla extract
- ½ cup prepared homemade caramel room temperature
- ¼ teaspoon salt
Instructions
For the Caramel (make in advance)
- Place sugar and water into a medium pot, stir to combine, but to not stir from this point forward. Cook over high heat,
- Cook until a nice amber color is reached and immediately remove from heat.
- Very slowly pour in room temperature heavy cream while whisking quickly. The mixture will bubble up a lot and boil. Add room temperature butter, return to heat, and bring back to a boil.
- Simmer for 2 minutes whisking constantly. If you want to make this a salted caramel, add your salt at this point. Whisk it in (start with less than you think you'll need), dip a spoon into the caramel, let it cool, taste it, add more salt as needed.
- Remove from heat and let cool to room temperature (about 2 hours).
For the Cheesecake
- Preheat oven to 300 degrees F. Line the entire inside of a 9-inch cake pan with aluminum foil. Press it into the pan to get it as flat as you can. You’ll use the aluminum foil to lift the cheesecake out of the pan when it’s baked and cooled.
- In a large mixer bowl, mix the cream cheese, sugar and flour together until combined. Use low speed to keep less air from getting into the batter, which can cause cracks. Scrape down the sides of the bowl.
- Add the sour cream, and vanilla extract and mix on low speed until well combined.
- Add the eggs one at a time, mixing slowly and scraping the sides of the bowl after each addition.
- Pour the cheesecake batter into the lined cake pan.
- Place the cake pan inside another larger pan. I use a larger cake pan, but you can use a roasting pan or any other larger baking pan. Fill the outside pan with enough warm water to go about halfway up the sides of the cake pan. Bake for 1 hour.
- Turn off the oven and leave the cheesecake in the oven with the door closed for 30 minutes. Do not open the door or you’ll release the heat.
- Crack oven door and leave the cheesecake in the oven for another 30 minutes. This cooling process helps the cheesecake cool slowly to prevent cracks.
- Remove cheesecake from oven and chill until firm, 5-6 hours.
For the Caramel Cake
- Preheat the oven to 350 degrees F. Spray or grease two 9-inch round cake pans. Cut out 9-inch parchment paper circles and press down in the bottom of each pan. (Trace the pan for perfect circles.)
- For the Cake: In a medium bowl, mix the cake flour, baking powder and salt together and set aside.
- In the bowl of your stand mixer, cream the butter and sugar together until light and fluffy. (Beat on high approximately 3-5 minutes to break down the sugar crystals.)
- Once the butter and sugar are well creamed. Scrape the mixing bowl with a rubber spatula. Then turn the mixer on low and beat in the eggs one at time, incorporating after each addition.
- Add vanilla and caramel and mix until incorporated.
- Scrape the bowl again. Turn the mixer back on low and alternate adding the flour mixture and buttermilk until both are well combined. Turn off the mixer.
- Pour the batter evenly into the two prepared pans. Bake on the middle rack, undisturbed for 30 minutes.
- Check the cake by inserting a toothpick into the center. If it comes out clean, take them out of the oven. If the toothpick has batter on it, bake another 5-10 minutes and recheck.
- Allow the cakes to cool 10 minutes in the pans. Then carefully flip them out on a cooling rack. Remove the parchment paper and cool completely.
For the Frosting
- In a stand mixer fitted with the paddle attachment, whip the butter on high until it’s fluffy and light (almost white in color), 5-6 minutes, scraping down the bowl and paddle a few times in between.
- Turn the mixer to low and add the powdered sugar a cup at a time, scraping down the bowl and paddle after each interval. Add the vanilla.
- With the mixer still on low, add the salted caramel. Add a pinch of salt, increase the speed to medium, and mix for 2 full minutes.
Assembling the Cake
- Move one cake to a cake stand or platter. Scoop about 1 cup frosting onto the cake. Use a large flat spatula to spread the frosting out evenly.
- Use the aluminum foil to lift the cheesecake out of the cake pan, remove the foil and place the cheesecake on top of the cake.
- Spread another cup of frosting evenly on top of the cheesecake, then add the second layer of cake on top.
- Gently press the cake a little to level the top. Then scoop all remaining frosting on top of the cake. Use the spatula to work the frosting over the top and down the sides.
- Use the back of an offset spatula to swirl from center to edge of top cake in one motion. Do the same on the sides, starting with the bottom. No need to be perfect! There's beauty in imperfection.
- Either place some caramel in a plastic bag and snip the tip or use a spoon to drizzle caramel drip around the edges of the cake.
- Place rest of frosting in a pastry bag fitted with a start tip and pipe dollops around edge of cake on top of caramel.

Dee
I made this cake and the flavors are amazing definitely adding to my favorites. I did however got thinner cake layers; mine did not look thick and wide as yours so not sure what I did wrong but other than that I love it.
Ashley Boyd
I'm happy to hear you enjoyed the cake! Thank you for trying our recipe.
Laura Hyatt
I like my layers to be higher and plan to use 8-inch pans. What adjustments do you recommend for time and temperature?
Ashley
Hi Laura,
This recipe works perfectly in 8-inch cake pans as well! No adjustments needed on the ingredients for the cake layers as the batter only fills the 9-inch pans about halfway. You will need to add 10-15 minutes more minutes to the cooking time, however, since the cakes are a little thicker. Also bake on 325 degrees instead of 350. Be sure and check for fineness with a toothpick. For the cheesecake, use the same measurements and fill your pan 3/4 full. You will have extra cheesecake batter leftover that you can use to make bites or something else fun. Make the same cooking time and temp adjustments as the cake. Please let me know how it turns out!
Ashley
Ashley
Typo - check for doneness with a toothpick.
Ahkeeia Payne
Ashley, this cake looks divine!!! Can't wait to try out this recipe.
Ashley
Thank you so much! Please let me know how it turns out!